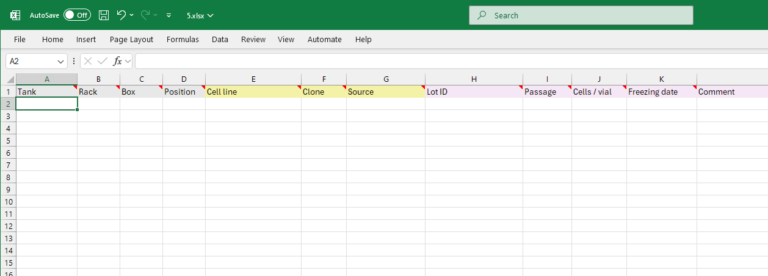
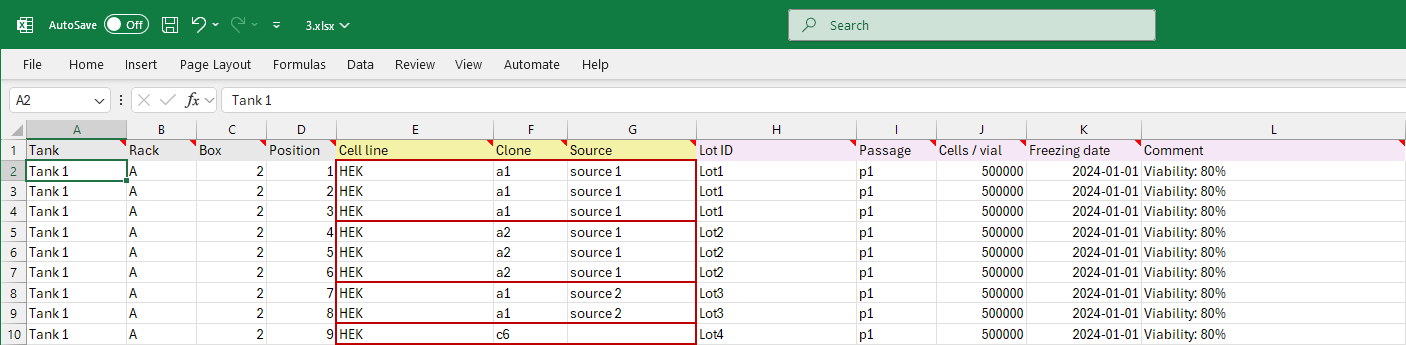
Importing your data into the Cellseeker Inventory straightforward, automated process. Simply fill out the provided Excel template, where each row represents an individual item (vial, tube, etc.) in your cryostorage, along with its associated details on cell lines and stocks. Once your data is imported, you can add additional information such as cell line properties, growth media, documentation, images, and details about your cell banks. While formatting your data may require some effort, it’s also a great opportunity to organize and clean up your records. You can always download your complete dataset, including all attachments, from the inventory at any time. Importing an entire database into Cellseeker can be a complex task, but we’ve made the process as seamless as possible. Our system provides clear instructions and detailed error messages to help you troubleshoot any issues efficiently. If you need further assistance, our support team is available via chat or email. When you upload your Excel import template, Cellseeker automatically checks it for inconsistencies. You’ll receive a downloadable report with precise guidance on how to correct any errors. Simply update your file and re-upload it—this process can be repeated as many times as needed. You can pause the import at any stage and will be prompted to confirm before the final upload. Once the final import is complete, certain key attributes, such as Lot IDs and cell line identities, become permanent to ensure data integrity and traceability. We also strongly recommend to use the import feature only for one import, if possible. Or for discreet sets of data, e.g. cryo-storage units at different locations. It is not possible to use the same lot IDs or cell lines over multiple imports. Before importing your existing inventory data into Cellseeker, you need to set up your virtual storage. Follow these steps: Navigate to the INVENTORY page. Click the ‘+’ (New Tank) button. In the dialog box, specify: The name and dimensions of your physical storage. The rack labeling system (numbers or letters). Cellseeker provides an Excel template for importing inventory data. Each row in the template corresponds to a single cryovial at a specific location in your storage. The columns are grouped into three categories: Location-related fields, Cell line-related fields, and Stock-related fields. These columns specify the exact location of each vial. Tank*: Name of the tank. This field must exactly match one of the tanks in your virtual storage. Rack*: Label of the rack, either a number (e.g., 1, 2, 3) or a letter (e.g., A, B, C), depending on your labeling system. Box*: Position of the box within the rack (e.g., 1, 2, 3). Position*: Position of the vial within the box, specified as a number (e.g., 1, 2, 3) or a coordinate consisting of a letter and a number (e.g., A1, A2, A3). Example: Each cell line is represented as a separate record in Cellseeker. To simplify the import process, only basic information is required in the import sheet. During import, a new entry will be created for each unique combination of cell line-related fields (Cell Line, Clone, and Source). This means that if any of these fields differ, a separate cell line entry will be created and associated with the vial.
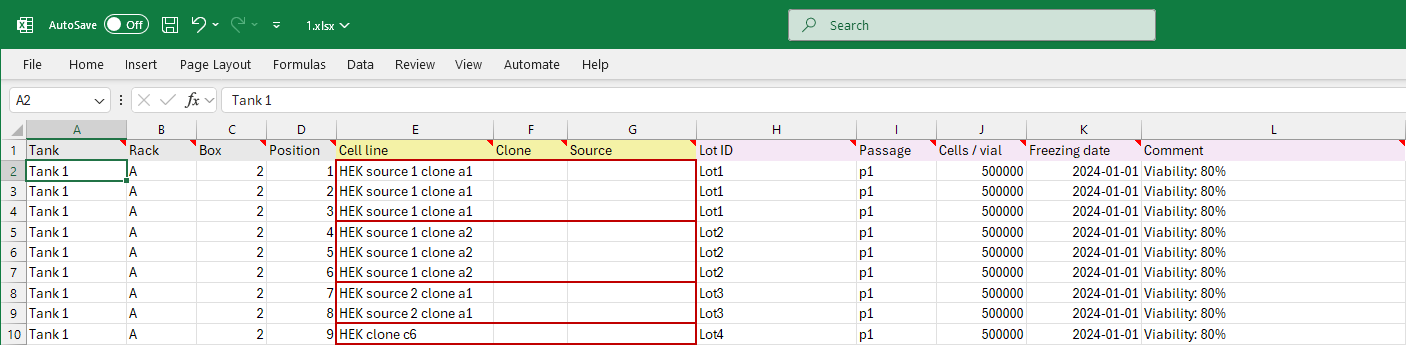
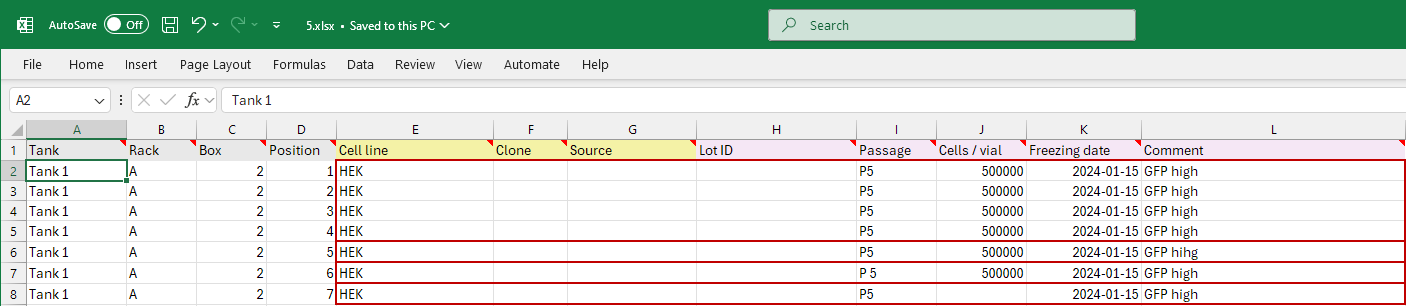
Cell Line names can uniquely identify each entry, but you may also use Clone and Source fields for further differentiation (see examples). After import, you can edit cell line names and other details as needed. Cell Line*: The name of your cell line. Clone (Optional): Used to distinguish different clones of the same cell line. Source (Optional): Used to specify the source of the cells, such as supplier or origin. Tip: To minimize errors, only use the optional Clone and Source fields if your data is already structured in this way and remains consistent for each vial from the same origin. Merging entries after import is not possible, but you can manually edit and rename them within Cellseeker. Examples: Both examples will result in the generation of four different cell lines in Cellseeker regardless the naming strategy. Example 1: Using only Cell Line Example 2: Using Cell Line, Clone, and Source In Cellseeker, a stock represents a collection of vials with identical characteristics, such as the same cell line, passage number, cell aliquot, and freezing date. During import, a new stock entry will be created for each unique combination of cell line-related fields (Cell Line, Clone, and Source) and stock-related fields (Lot ID, Passage Number, Aliquot, Freezing Date, and Comments). This means that if any of these fields differ, a separate stock will be created and associated with the vial.
If you already use unique stock identifiers, you can enter them in the Lot ID column. Alternatively, Cellseeker can automatically generate Lot IDs, which serve as unique identifiers (see examples). Enabling this option overrides any values entered in the Lot ID column of your import sheet. Lot ID: Required only if you use your own unique stock identifiers. Passage Number: Specifies the passage number of the stock. Aliquot (cells/vial): Number of cells per vial. Use numeric values (e.g., Freezing Date: The date the stock was frozen. Accepted formats include Excel date format or text in Comments: Field for additional notes about the stock. Examples: Example 1: Using your own Lot IDs If there are 7 vials for the same stock but some rows contain typos or missing fields, Cellseeker will treat these as separate stocks and throw errors because the Lot ID is not consistent. Result: The system will separate four stocks: Stock with Passage number "P5" and comment "GFP high" (4 vials) Stock with Passage number "P5" and comment "GFP hihg" (1 vial due to typo in Comments) Stock with Passage number "P 5" and comment "GFP high" (1 vial due to typo in Passage number) Stock with Passage number "P5", comment "GFP high" and missing Cells/Vial field. (1 vial due to a missing field) Due to the similar Lot ID ("L001" line 4, 5 and 6 will be annotated with the error "Lot ID already used") Example 2: Using Generated Lot IDs When using generated Lot IDs, vials with inconsistent data in stock-related fields will be treated as separate stocks. Result: The system will create the four separate stocks with unique Lot IDs without displaying any errors since the vials with identical stock and cell origins will be treated as identical stocks. Log into your Cellseeker account as and Admin or Owner, navigate to the account menu and then to Import. On this page you can upload your Excel template. During the import process, Cellseeker will validate the data and notify you of any errors, such as mismatched tank names or duplicate entries. You can download, work on your error file and reupload it again for validation. If you resolved all your problems annotated in the error file, complete the import process with the "Start import" button.Data import
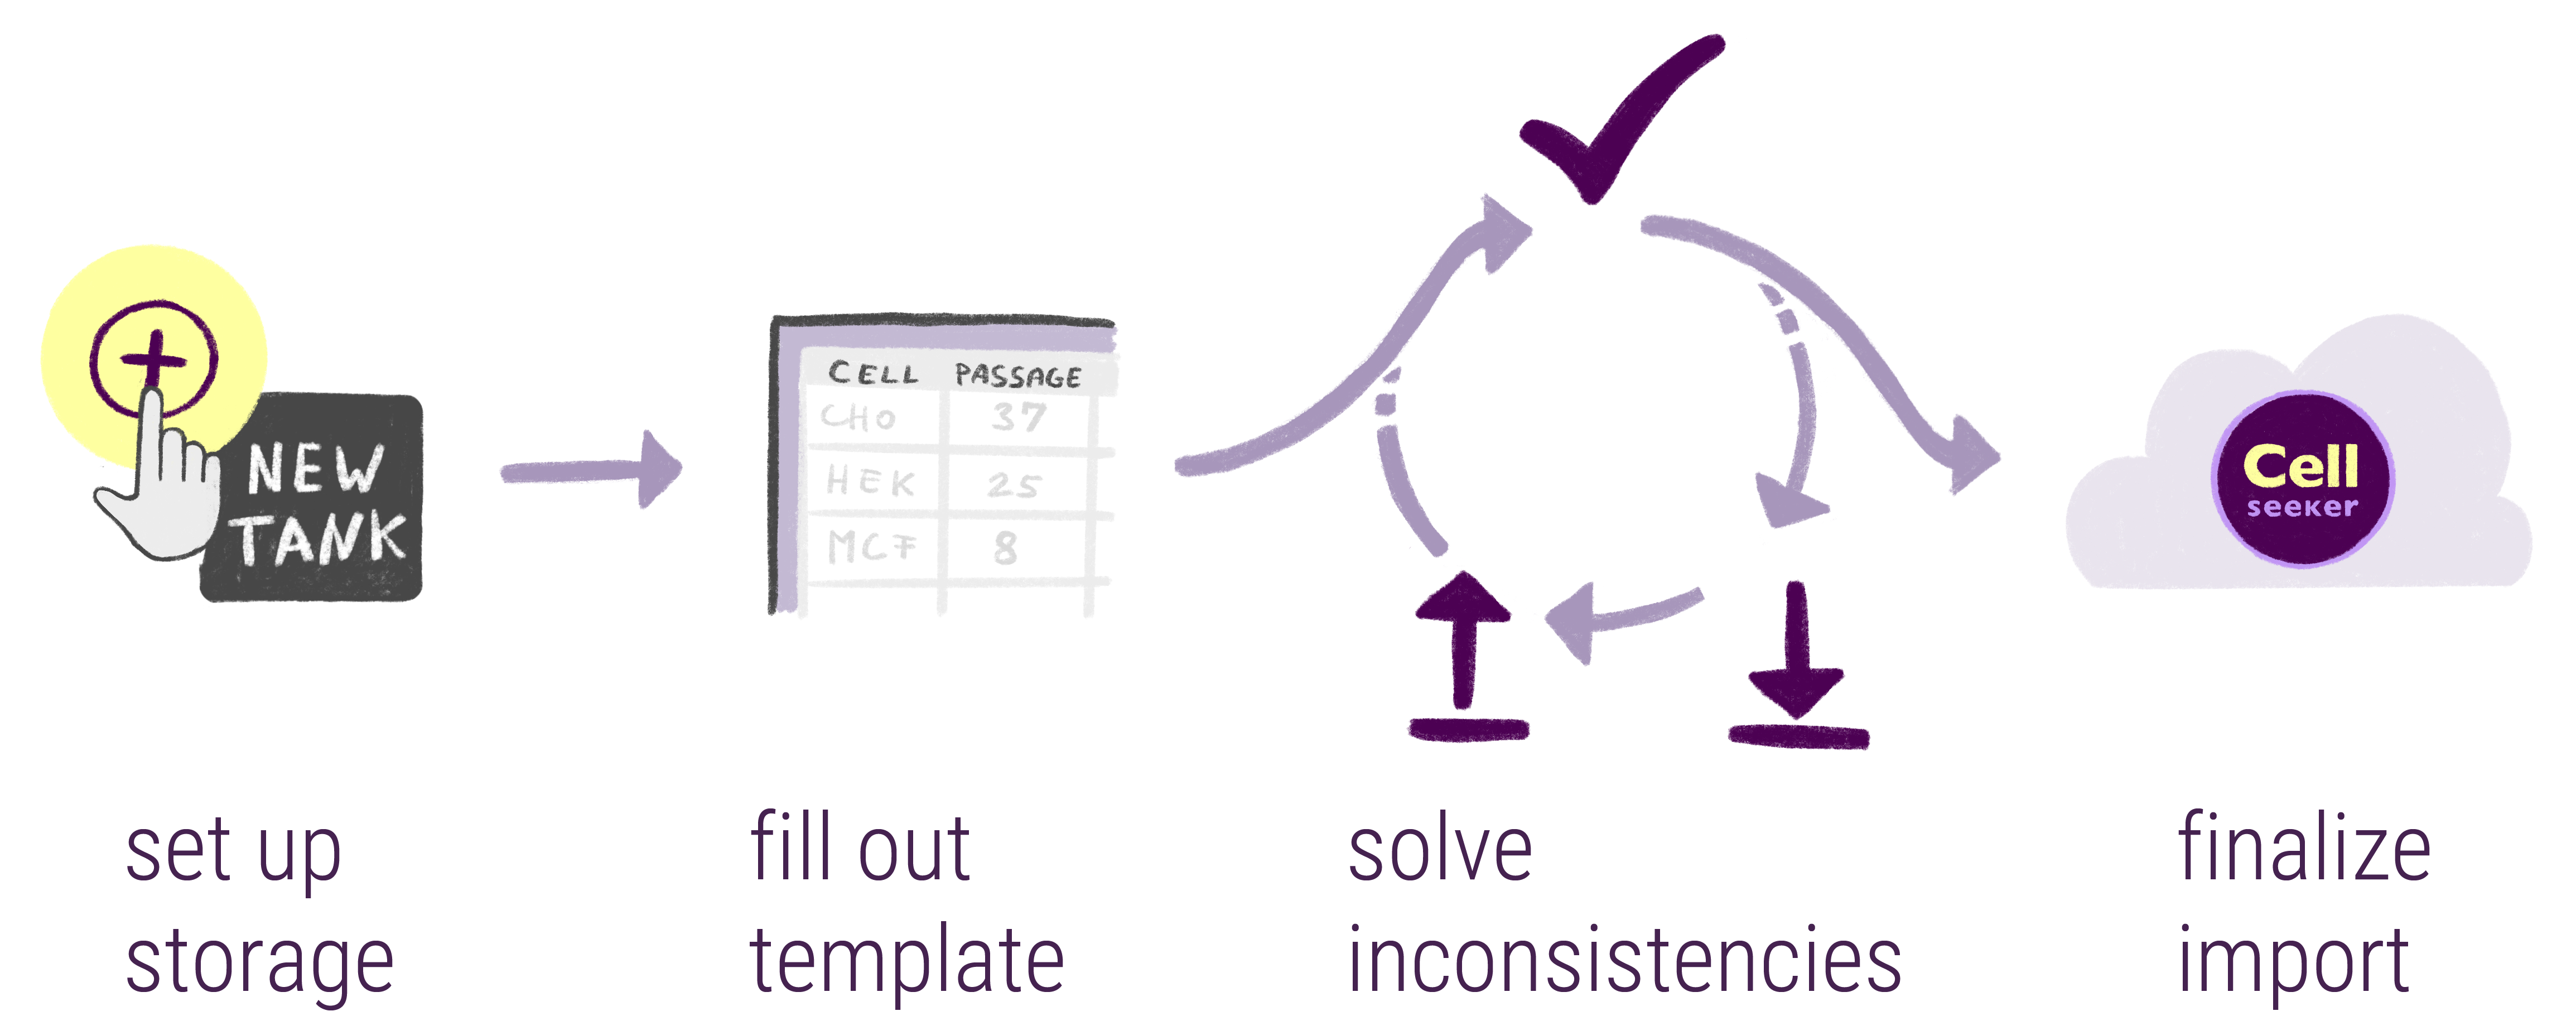
Import procedure
Data Import with Guided Error Resolution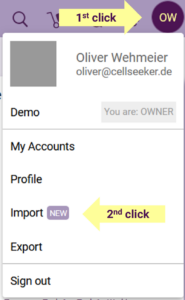
How to Import Existing Cell Inventory Data into Cellseeker
Step 1: Create Your Virtual Storage
Step 2: Download and Populate the Excel Template
1. Location-Related Fields

2. Cell Line-Related Fields
3. Stock-Related Fields
5000000 or 5E+06). Avoid text formats like "5 million" or "T75", as such details should be added to the Comments field.YYYY-MM-DD.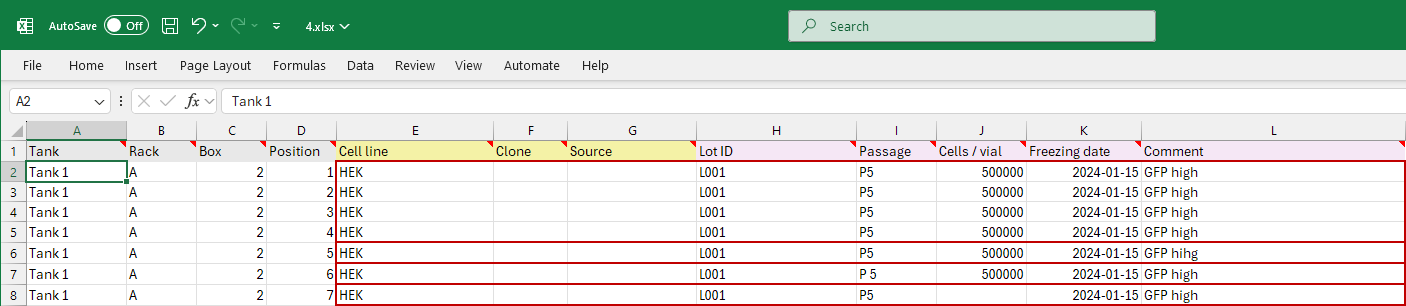
Step 3: Upload your Excel template and start the import process
Additional Notes: